Build Lightning Piggy Classic
Step-by-step guide to building the E-paper edition Lightning Piggy
Note: This is the guide for Lightning Piggy Classic (E-paper edition). For the latest LCD version, see the p1 Build Guide.
For Lightning Piggy p1 click here! Making your very own Lightning Piggy is squealy easy. Here are the steps you need to follow:
- Source the parts.
- Create a wallet.
- Flash the firmware.
- Connect to and configure your piggy.
- Make a case and assemble the parts.
💡 IMPORTANT: This is not a toy. It contains small parts which could be a choking and ingestion hazard. There are also sharp edges. It should not be handled by children under 4 years of age. Assembly and use of this product is at your own risk. We take no responsibility for any losses that may be incurred.
Quick Start Guide
If you already have the single board computer, follow these steps:
-
Choose a wallet that supports Nostr Wallet Connect (NWC).
- For beginners: We recommend Coinos - it’s simple and custodial (with the option to auto-withdraw to cold storage), so you can get started quickly.
- For a non-custodial setup: We recommend LNbits or Alby Hub - both support multiple friends and family accounts and are easy to use.
Once your wallet is set up, copy your Lightning Address and NWC link - you’ll need both in the next step.
-
Flash the firmware using the installer below. You’ll need a Wi-Fi enabled computer with Chrome, Brave, Opera, or Edge browser.
-
Connect to and configure your Piggy (see Accessing Piggy’s Configuration Settings below).
Full Guide
1. Source the parts
Single Board Computer (SBC): LILYGO T5 V2.3.1 e-paper device with a 2.13 inch screen (DEPG0213BN) and a 9102 chip. Available direct from LILYGo or from resellers.
Rechargeable battery: Voltage: 3.7V Connector: JST 2pin 1.25mm. Available from…
-
Rokland 1100mAh.
-
Aliexpress 1200mAh.
-
MakerFocus 1000mAh. Note: The size of this battery 26 44 9 mm (1.02 1.73 0.35 inch) doesn’t fit perfectly in the Genesis and Robotechy pig cases.
Case: One homemade case using materials of your choice.
Micro USB data cable: Available cheaply for bulk purchases from Aliexpress or Amazon if you don’t have one lying around.
💡 IMPORTANT: Improper assembly and/or the use of improper/faulty batteries can present a fire hazard. We recommend using only high quality LiPo rechargeable batteries. Before connecting the battery, check the connector is correctly wired. The red wire needs to align with the positive ”+” terminal, and the black wire needs to align with the negative ”-” terminal. If the battery you have sourced has the polarity switched, it’s possible to swap the wires by carefully lifting the plastic JST connector retainers.
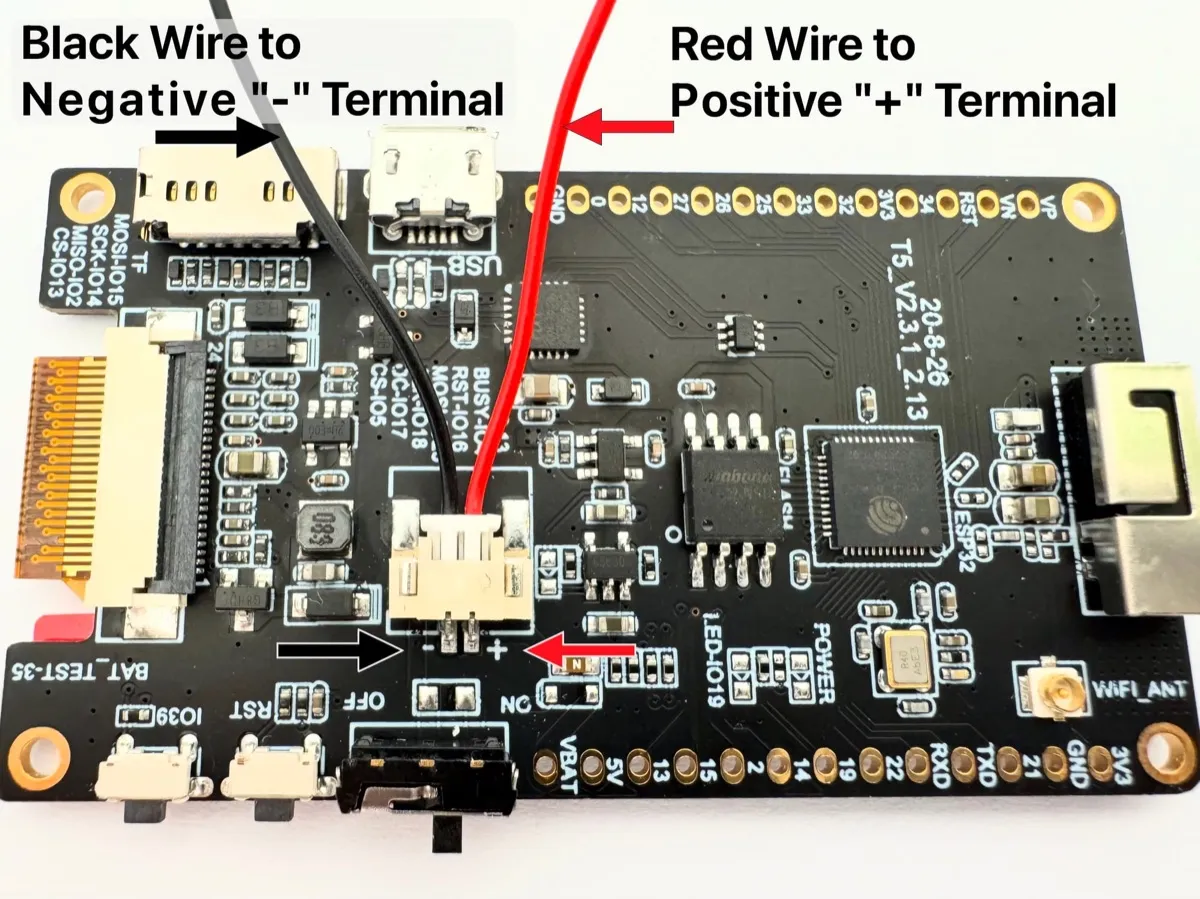 Before connecting the battery, check the connector is correctly wired.
Note: The device can operate without a battery if powered via the micro USB port.
Here’s an image showing your piggy’s controls:
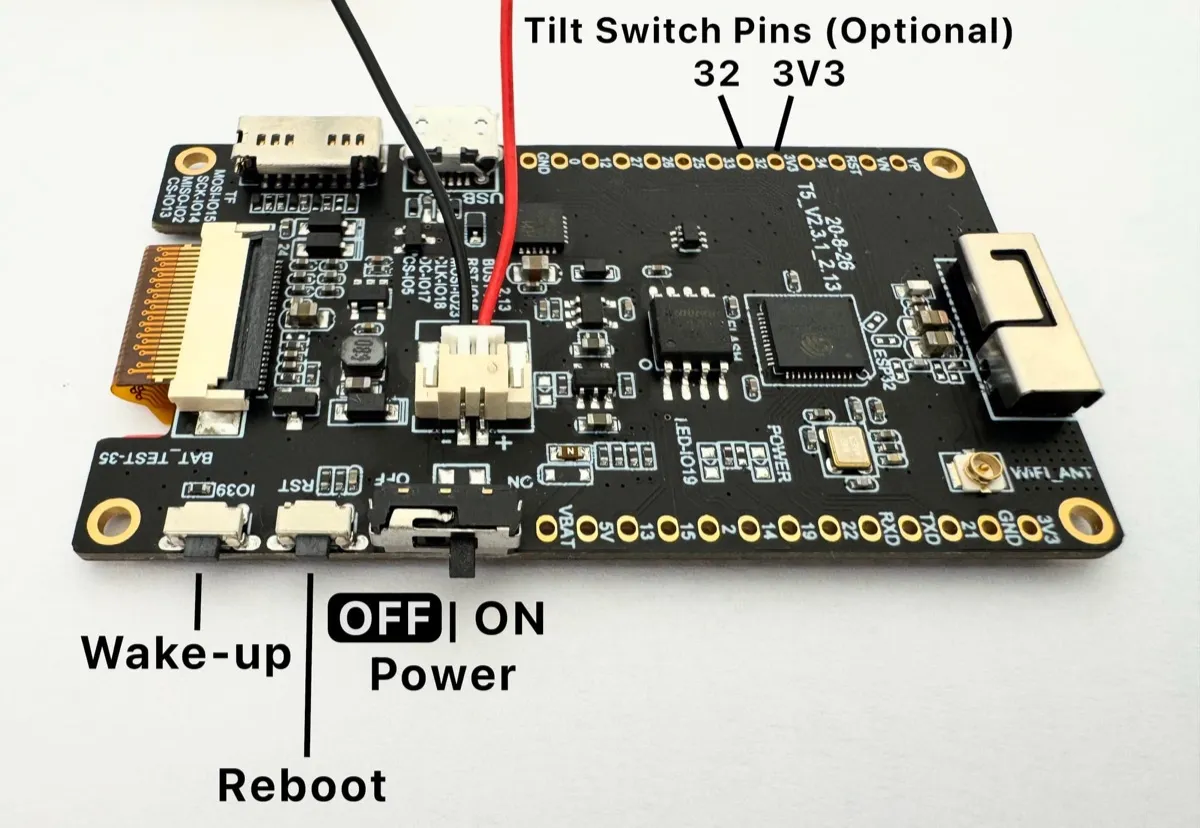 Lightning Piggy’s Controls
If you’d like to add a tilt switch, simply solder it between pins 32 and 3V3. Any standard tilt switches will work; for example, the SW-520D ball switch is a suitable option.
2. Create a Wallet
Choose one of two options for connecting your piggy:
You have two options for connecting your piggy:
- NWC (Nostr Wallet Connect) - A protocol that lets you securely link your Bitcoin wallet to applications without exposing your private keys. Simple and safe.
- LNBits - A versatile wallet and payment processing system for the Lightning Network, offering more control and customisation.
Below is a detailed comparison:
| Feature | NWC | LNBits |
|---|---|---|
| Purpose | Protocol for connecting Lightning wallets to apps via Nostr | Multi-wallet Lightning account system |
| Prerequisites | No server required, just a NWC-compatible wallet | Requires hosting a server or using a hosted instance |
| Ease of Use | Easy! Copy and paste NWC link | Requires LNBits instance setup |
| Custodianship | Non-custodial and custodial options | Non-custodial (self-hosted) or custodial |
| Wallet Support | Any NWC-enabled wallet | Internal + NWC via extension |
| Best For | Simple wallet connection | Self-hosted, multiple accounts, extensions |
Nostr Wallet Connect
Choose an NWC-enabled wallet and follow the provider’s setup instructions. Here are some popular options:
| Wallet | Description |
|---|---|
| Alby Hub | Self-custodial, open-source lightning wallet that connects to apps |
| Cashu | Free, open-source Bitcoin wallet that uses ecash |
| Coinos | Free custodial web wallet and payment page |
| Primal | Popular nostr client with integrated custodial wallet |
| Zeus | Self-custodial, open-source Bitcoin wallet |
Go to the NWC information page in your chosen wallet (usually found in the settings). Locate and copy the NWC link, which should follow this structure:
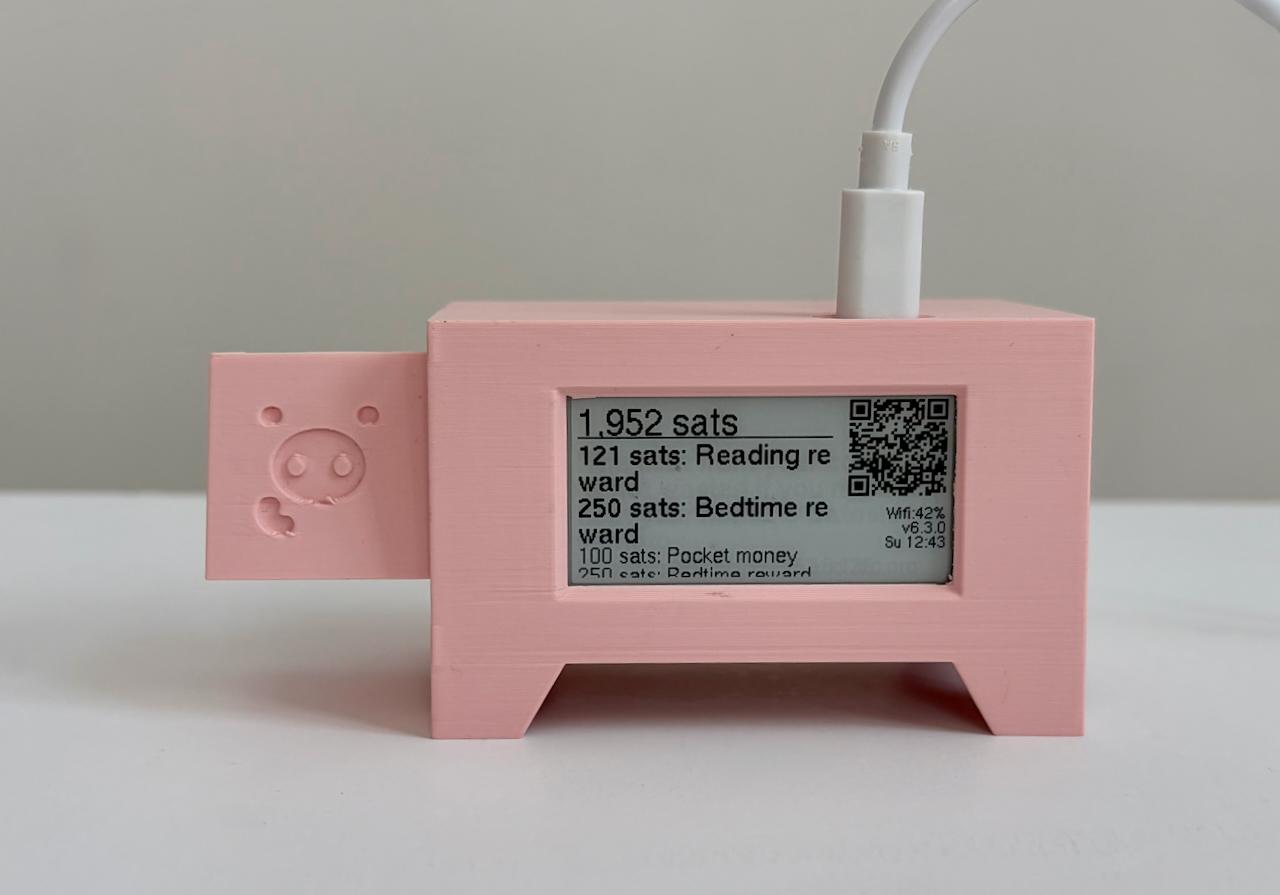
nostr+walletconnect://f3a192b445cd7e8f2d4a60c578eb932a57b83d9265fa790042bd865937c2e5d9?relay=wss%3A%2F%2Frelay.example.com&secret=11d4fc982746ab5389f75efc3ddaa94761e35fb209ec8d7a4b3d248ac4e6f710&lud16=RandomWallet@domain.comKeep a record of your wallet’s Lightning address (which resembles an email address), as it will be used to receive bitcoin payments over the lightning network. This address will be automatically converted into a QR code and displayed on the Piggy’s screen for easy scanning.
LNbits
If you wish to run a LNbits wallet, please refer to our detailed guide for step-by-step instructions.
3. Flash the firmware
Connect your Lightning Piggy to your computer with a USB data cable (some USB cables only supply power - if nothing happens, try a different cable).
When prompted, select the serial port - usually the one labelled “CP210” (that’s the USB-to-Serial chip in the device). Click Install and wait for the process to complete. Don’t unplug your device during installation.
Once installed, the device will automatically reboot with its Wi-Fi access point enabled for approximately 20 seconds, allowing you to connect and configure the software.
4. Connect to and configure your piggy
If you don’t see the Piggy Config access point in your available Wi-Fi networks after updating the software, press and hold the IO39 (Wake-up) button for at least 3 seconds to activate it.
Lightning Piggy’s Controls
Please note, since the piggy’s access point doesn’t provide internet access, the device you’re using to connect to it may automatically disconnect after a period of inactivity. It is worth preparing your credentials (summarised below) in advance for easy copy and paste.
| Connection | Required Credentials |
|---|---|
| WiFi | SSID, Password |
| NWC | NWC link (e.g., nostr+walletconnect://...), Lightning address |
| or LNBits | Server name (e.g., https://my.lnbits.com/), Invoice/read key |
Accessing Piggy’s Configuration Settings
1. Activate Piggy’s Wi-Fi access point
On another device (e.g., a laptop or smartphone), press and hold Piggy’s IO39 (Wake-up) button for at least 3 seconds. A “Starting wireless Access Point for configuration…” message will appear on Piggy’s display.
2. Connect to the “Piggy Config” Wi-Fi network
After a few seconds, a new Wi-Fi network called Piggy Config will appear in your device’s Wi-Fi settings. Connect to it.
Piggy’s screen will display:
- The web address to open in your browser (e.g.,
http://192.168.4.1/) - The login credentials - username:
piggy, password:oinkoink
3. Open the configuration page
In your browser, navigate to the web address shown on Piggy’s screen. Log in using the credentials above, then:
- Enter your Wi-Fi network details.
- Enter your NWC (Nostr Wallet Connect) or LNbits credentials.
- Click Save.
- Restart the device.
The device should now connect to your Wi-Fi network and display your satoshi balance, QR code to receive lightning payments, and list your recent transactions (if any).
Notes:
- Starting from version 5, your Piggy will remember its configuration settings even after a software update. You won’t need to re-enter them, as long as you don’t choose to erase the device during installation.
- If you’re powering the Piggy via USB, you can enable the “Always run webserver” option in the settings. This keeps the Wi-Fi access point active, making it easier to reconnect anytime.
5. Make a case and assemble the parts
Time to get creative! Build your very own Lightning Piggy case out of any material you wish to use, and assemble the parts.
💡 IMPORTANT: When installed correctly, the battery and/or board components should not get hot when it is being charged (i.e. the USB is connected to power and the battery is installed).
Check out our case options.
If you would like to share your design with others, please either email your creation to oink@lightningpiggy.com, or post a note on nostr with a photo of your piggy, including the hashtag #zapmypiggy for inclusion on this website.
Join our telegram chat for help or inspiration, or to share your work with other Lightning Piggy builders.